The Charm of Chives: A Hardy Herb Worth Growing and Eating
- Stevie Vanhalen

- Jun 8, 2025
- 5 min read
Updated: Jun 10, 2025

At Juniper Rose Farmstand, we’re passionate about cultivating plants that nourish both body and garden—and chives fit that bill perfectly. Chive flower season is upon us! These unassuming green herbs may seem humble, but they bring significant benefits to your kitchen, pollinator population, and planting beds.
What Are Chives?
Chives (Allium schoenoprasum) are part of the onion family (Alliaceae). They are prized for their mild, oniony flavor, and cheerful purple blooms. As a perennial herb, they return year after year, making them a low-maintenance yet rewarding addition to any garden or container setup.
Their hollow, slender green leaves add not only flavor but visual texture to dishes. Come late spring or early summer, they reward you with pom-pom-like violet flowers that are just as edible as they are beautiful.
Why Grow Chives?
Aside from being a delight in the kitchen, chives offer several benefits that make them a gardener’s favorite:
Easy to Grow: Whether you’re starting from seed or dividing a clump, chives are among the simplest herbs to cultivate.
Low Maintenance: They’re drought-tolerant, hardy, and forgiving, making them perfect for beginners and busy gardeners alike.
Pollinator-Friendly: Their flowers attract bees and other beneficial insects, helping to support your entire garden ecosystem.
Space-Saving: Chives grow in neat clumps and don’t require much space—ideal for pots, raised beds, or tucked into corners of your vegetable plot. I enjoy mine as boarders.
How to Grow Chives
Planting Time: Spring or early summer is ideal.
Light: Full sun is best, but they tolerate partial shade.
Soil: Well-drained soil is key.
Water: Regular watering helps, though they handle dry spells surprisingly well.
Maintenance: Harvest often by snipping leaves just above the soil line. Doing so encourages fresh, tender regrowth. To prevent overcrowding, divide clumps every 2–3 years.
Protect your chives from extreme cold if winters are especially harsh in your area—although they’re impressively hardy and often bounce back come spring. At Pinantan Lake in Canada we are in zone 3 and they come back every year. However, you can always place a mound of mulch or straw around them in the fall to add some extra protection.
How to Use Chives in the Kitchen
Chives are versatile and lend a fresh, mild onion flavor to many dishes. Here are a few ways to use them:
Sprinkle chopped chives over scrambled eggs, omelets, or quiches.
Add to soups, creamy dips, or salad dressings for a burst of flavor.
Stir into mashed or baked potatoes for a classic touch.
Mix into butter, sour cream, or cream cheese for a simple spread.
Garnish grilled fish or chicken, or add to fresh garden salads.
And don’t overlook the edible flowers—they’re not just pretty. These purple blooms can be tossed into salads, used as a colorful garnish, or infused in vinegar for beautiful, and flavourful salt blends.
Garlic Chives: A Bold Cousin
For those who like a little extra zing, consider growing garlic chives, which feature flat leaves and a subtle garlic flavor. They’re just as easy to grow, and they offer a slightly different taste that’s perfect for stir-fries and savory dishes.
Ready to bring more chive-inspired flavor into your home? We’re sharing a few of our favorite recipes using fresh chives—from herb salts, compound butter, and chive blossom vinegar. Whether you're cooking for friends or just elevating a simple lunch, these recipes will show just how much flavor this little herb can deliver. Chive blossoms are definitely a springtime treat.
When Harvesting and Preparing Chive Blossoms remember these key notes for your recipes!
Pick them in the morning when they’re most fragrant and vibrant.
Choose fully open blossoms, avoiding any that look wilted or damaged.
Carefully snip them from the stem, then rinse gently under cool water and pat dry.
Make sure your blossoms are clear from bugs! I made this mistake not rinsing good enough.
I allow them to dry completely.
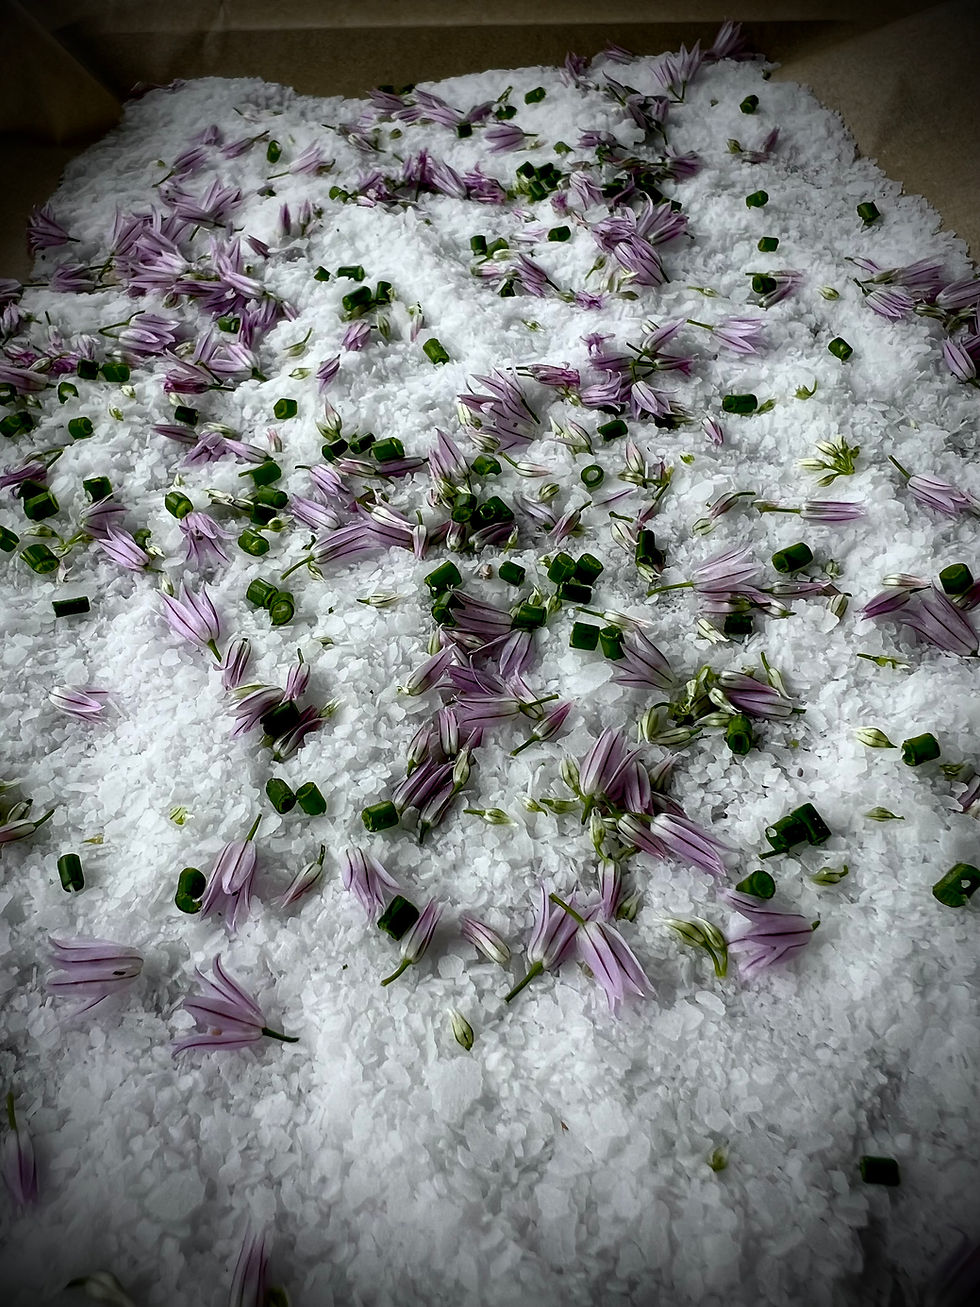
CHIVE FLOWER SALT
prep time 5 MINUTES
drying time 4 DAYS
servings 8 OUNCES
INGREDIENTS
1 cup kosher salt
1/3 cup chive blossoms
INSTRUCTIONS
In a medium bowl, stir together the salt and chive blossoms until evenly distributed.
Empty the mixture onto a large plate lined with a paper towel and cover with cheesecloth for protection. Allow the mixture to dry out until the blossoms feel papery to the touch, about 4 days, stirring the mixture once a day to ensure that it dries evenly.
Once dried, empty the mixture into a jar and keep sealed. Will keep for up to 1 year stored in a cool, dry place.
Store the chive flower salt away from sources of light and heat. A cool dark cabinet is the best spot. Chive flowers will lose their color over time as the salt absorbs their flavor.
pick the right salt
Opt for flaky with large crystals such as Maldon salt, Cyprus flake salt, or Diamond Crystal kosher salt.
CHIVE COMPOUND BUTTER

prep time 10 MINUTES
servings 8 OUNCES
INGREDIENTS
1 Cup unsalted butter softened to room temperature
¼ Cup snipped purple chive blossoms
¼ Cup chopped green chive stalks
½Tsp. Himalayan pink salt (or to taste)
¼ – ½ Tsp. cracked black pepper OR white pepper if you don’t want black flecks in the butter (pepper is optional)
1 Clove grated garlic (optional)
INSTRUCTIONS
Wash and pat dry the blossoms and chive stalks
Snip florets off of the purple blossom heads and set aside
Snip green chive stalks and set aside
Put softened butter into a bowl and with a spatula, mix in salt and pepper (and grated garlic if using)
Gently fold in the blossoms and chives
Spoon onto a sheet of parchment paper and fold the paper over, rolling the butter into a cylinder. Twist the ends tight to seal.
Refrigerate until solid (Use within 2-3 weeks or freeze for later use)

CHIVE BLOSSOM VINEGAR
Prep Time: 5 MINUTES
Total Time: 14 DAYS
Servings: 16 SERVINGS
INGREDIENTS
235 g vinegar (1 cup/8 fl. oz.) such as champagne, white white or red wine vinegar
5 flowering chive heads
INSTRUCTIONS
You will need an 8.5 fl. oz or 250 mL bottle or jar with a tight-fitting lid, screw cap, or cork. If reusing a bottle, clean and remove the label first. Sterilize the bottle in your dishwasher or in a simmering water bath for 5 minutes. Remove the bottle from hot water using canning tongs and drain upside down on a dish rack.
Shake off any soil or insects that may be hiding in the chive blossoms. Place 5 flowering chive heads into the bottle, using a skewer to help push them through the neck if needed.
Fill the bottle with vinegar and seal. Store in a cool dry place and allow the chive blossoms to infuse the vinegar for 2 weeks before using. I shake mine once a day or every other day during the 2 weeks.
Once you have your chive blossom vinegar, get creative in the kitchen by using it in salad dressings or tangy marinades.
*****
Stevie Van Halen is a Master Herbalist who has a n educational background in Nursing and Holistic Health. She enjoys research data and articles of health, whole food, herbs, and gardening. All articles on this blog are written by and her. All information and resources are sited and referenced.
All health content on juniperrosegarden.com is provided for general information only, and should not be treated as a substitute for the medical advice of your own doctor or any other health care professional. If you have any concerns about your general health, you should contact your local health care provider.


Comments